Archive for the ‘Hardware’ Category

Using parted to create partitions on 3TB raid on our new server.

[root@server ~]# parted /dev/sdb
GNU Parted 1.8.1
Using /dev/sdb
Welcome to GNU Parted! Type 'help' to view a list of commands.
(parted) print                                                            

Model: AMCC 9650SE-8LP DISK (scsi)
Disk /dev/sdb: 3000GB
Sector size (logical/physical): 512B/512B
Partition Table: gpt

Number  Start  End  Size  File system  Name  Flags

(parted) mklabel gpt                                                      
Warning: The existing disk label on /dev/sdb will be destroyed and all data on this disk will be lost.
Do you want to continue?
parted: invalid token: gpt
Yes/No? Yes                                                               
New disk label type?  [gpt]?                                              
(parted) mkpart primary 0 -0                                              
(parted) print

Model: AMCC 9650SE-8LP DISK (scsi)
Disk /dev/sdb: 3000GB
Sector size (logical/physical): 512B/512B
Partition Table: gpt

Number  Start   End     Size    File system  Name     Flags
 1      17.4kB  3000GB  3000GB               primary       

(parted) quit                                                             
Information: Don't forget to update /etc/fstab, if necessary.             

[root@server ~]# mkfs.ext3 /dev/sdb1
mke2fs 1.39 (29-May-2006)
Filesystem label=
OS type: Linux
Block size=4096 (log=2)
Fragment size=4096 (log=2)
366215168 inodes, 732406263 blocks
36620313 blocks (5.00%) reserved for the super user
First data block=0
Maximum filesystem blocks=4294967296
22352 block groups
32768 blocks per group, 32768 fragments per group
16384 inodes per group
Superblock backups stored on blocks: 
	32768, 98304, 163840, 229376, 294912, 819200, 884736, 1605632, 2654208, 
	4096000, 7962624, 11239424, 20480000, 23887872, 71663616, 78675968, 
	102400000, 214990848, 512000000, 550731776, 644972544

Writing inode tables: done                            
Creating journal (32768 blocks): done
Writing superblocks and filesystem accounting information: done

This filesystem will be automatically checked every 21 mounts or
180 days, whichever comes first.  Use tune2fs -c or -i to override.

[root@server ~]# tune2fs -c0 -i0 /dev/sdb1
tune2fs 1.39 (29-May-2006)
Setting maximal mount count to -1
Setting interval between checks to 0 seconds
We have a number of vme computers that I need to set up. All of them will be using an 8GB compact flash drive as their hard disk. The details for how to set this up are all on this page. Now, I need to install linux on a bunch of compact flash drives and was looking for a way to clone one after I’d set it up how I wanted. Since I normally use a mac laptop, I also wanted to be able to use that. Here’s what I did.

First, install linux on one of the compact flash drives by pulling all the internal drives out of a computer and using the linux expert method. Once this is installed and all the other required software is installed, use dd to make an image on my mac.

sudo dd if=/dev/disk2 of=~/Desktop/crate.img

I know the input is /dev/disk2 because when I mount the compact flash drive, it would show as:

/dev/disk2s3    6.9G   1.6G   5.0G    24%    /Volumes/:
/dev/disk2s1    101M   9.1M    87M    10%    /Volumes/:boot

The s3 is the partition for / and s1 is the partition for /boot. (s2 would also be the swap partition.) Since I want to copy the entire disk and not each partition, I use /dev/disk2.

Using dd to copy the disk takes a long time, but it can be left unattended. You can check that it’s working by doing a listing of ~/Desktop/crate.img. The size will slowly be increasing.

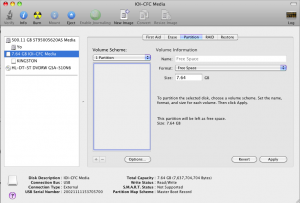
Once the image has been created, prepare a new compact flash drive to use for the clone. The key here is that the partition on the drive must first be deleted. I used Disk Utility for this.

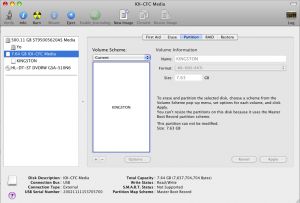
Here’s how the new compact flash card looked when I attached it to my laptop.

I needed to delete that KINGSTON partition to be able to copy my image back. Change the Volume Scheme to 1 Partition and then format it with Free Space.

The disk is now still connected to the laptop, but it has no partitions, so nothing is mounted. Now use the dd command again to copy the image to the new compact flash card.

sudo dd of=/dev/disk2 if=crate.img

Again, it takes a long time, but when it’s done, I can put the card in the vme crate and it boots successfully. I just need to ok any new hardware changes it finds and configure a new ip address for it.

We got a couple of new Supermicro Superservers (sys-5026t-tb) that I was planning to set up as dual-boot computers. I installed windows xp fine and did a kickstart install of RHEL5. The installation went fine, but after rebooting, every time I tried to boot to linux I would get this error:

Unable to access resume device (LABEL=SWAP-sdb2)
mount: could not find filesystem '/dev/root'
setuproot: moving /dev/failed: No such file or directory
setuproot: error mounting /proc: No such file or directory
setuproot: error mounting /sys: No such file or directory
switchroot: mount failed: No such file or directory
Kernel panic - no syncing: Attempted to kill init', -12000

The problem was that, even though it installed the operating system, it did not load the sata drivers. I had this problem before and could just go in and edit /etc/modprobe.conf to alias scsihostadapter ahci from ata-piix. But the problem I was having now, is that the ahci drivers were never installed. I got a file from Supermicro that was supposed to fix this, but I was having a problem installing it when I boot into rescue mode.

I did find out that the reason that it was not installing the driver was due to the presence of the dvd drive that I was using to boot. So, my solution was to take out the dvd drive and boot from a usb flash drive. I did the installation that way and things worked just fine. I could probably reconnect the dvd drive and use it now, but I’ve decided that I really don’t need it, as I install most software from the network.

Had a weird problem come up today. I reboot one of our systems and it would not come up. Actually, it apparently was working, just ridiculously slowly. I thought it had hung at the Starting udev line, but letting it run for an hour, got it a few lines further down. Nonetheless, something was definitely wrong. I tried my usual ideas of adding apm=off acpi=off noapci noapmd, but that didn’t help. It seemed like the disk was bad, but not with the usual messages that I would get.

I brought out a RHEL installation disk and boot into rescue mode. I did get an error about it not being able to find all of the current linux installations. I then went into the bios and found that this computer was set up to have its sata disks act like ide ones. I’m pretty sure that I did this when I originally installed because it wouldn’t recognize the drives as ahci. However, I’m also sure that they should be ahci, which is newer, instead of acting like the old ide. So I changed this to ahci, even though I was sure this was going to cause more problems. (I was right about the last part.)

I then again, did a linux rescue. For some reason, I no longer got the error about not finding all my linux installations. I could run chroot /mnt/sysimage to get my installation mounted properly. Then, I copied /etc/modules.conf to /etc/modules.conf.SAVE. I knew that I needed to change the modules that were loaded to reflect ahci drives instead of ide ones. So I edited this line:

alias scsi_hostadapter1 ata_piix

to

alias scsi_hostadapter1 ahci

This would work for after the kernel is loaded, but I needed to make sure the ahci module was loaded at boot. For this, I needed to make a new initrd image. I used the following:

mkinitrc --preload=ahci \\
/boot/initrd-2.6.9-89.0.3.ELhugemem.mary.img \\
2.6.9-89.0.3.ELhugemem

Then, I edited /etc/grub.conf to take this initrd file instead of the one it had. And lastly, to make sure it was using the proper disk. For some reason, my disk devices would change from /dev/sda and /dev/sdb to /dev/sdb and /dev/sdc. Instead of putting the device names in /etc/grub.conf, I used the labels.

kernel /vmlinuz-2.6.9-89.0.3.ELhugemem ro root=/dev/sda3 rhgb quiet

I also used the labels in /etc/fstab.

LABEL=/1                   /                       ext3    defaults        1 1
LABEL=/boot	        /boot                   ext3    defaults        1 2

After I reboot and everything worked, I renamed the initrd file without the mary bit, thus overwriting the original.

One thing I was worried about was whether I would have to do this each time I updated the kernel. Fortunately, there was a kernel update ready, so I installed it. The initrd file that came in worked perfectly. I didn’t have to do anything special.

I had to reinstall a computer with XP. It would boot off the cd ok, but then after the “Setup is inspecting your computer’s hardware configuration” message came up, it wouldn’t do anything. It was just a blank screen. I ran memtest to check the memory and it all came up clean. I did notice that the light for hard drive activity would be constantly lit when the screen was blank. However, I had no problem at all in installing linux on this computer. So, I used a live cd of Damn Small Linux (DSL) to boot. Then I ran the following command:

# sudo fdisk /dev/hda

The number of cylinders for this disk is set to 9729.
There is nothing wrong with that, but this is larger than 1024,
and could in certain setups cause problems with:
1) software that runs at boot time (e.g., old versions of LILO)
2) booting and partitioning software from other OSs
   (e.g., DOS FDISK, OS/2 FDISK)

Command (m for help): o
Building a new DOS disklabel. Changes will remain in memory only,
until you decide to write them. After that, of course, the previous
content won't be recoverable.

Command (m for help): w

After this, the windows installation worked fine.

I decided to take all the old scsi disks that I have and attach them to an old pc and use the setup as a backup computer. I’ll put as many disks as I can into a software raid to use for backups and then put a dvd writer in the computer to use to write dvds.

Here is the scsi stuff attached:

Host: scsi0 Channel: 00 Id: 01 Lun: 00
  Vendor: SEAGATE  Model: ST3146807LW      Rev: 0007
  Type:   Direct-Access                    ANSI SCSI revision: 03
Host: scsi0 Channel: 00 Id: 02 Lun: 00
  Vendor: SEAGATE  Model: ST336607LW       Rev: 0006
  Type:   Direct-Access                    ANSI SCSI revision: 03
Host: scsi0 Channel: 00 Id: 03 Lun: 00
  Vendor: SEAGATE  Model: ST336607LW       Rev: 0006
  Type:   Direct-Access                    ANSI SCSI revision: 03
Host: scsi0 Channel: 00 Id: 04 Lun: 00
  Vendor: SEAGATE  Model: ST336607LW       Rev: 0006
  Type:   Direct-Access                    ANSI SCSI revision: 03
Host: scsi0 Channel: 00 Id: 08 Lun: 00
  Vendor: SONY     Model: SDT-11000        Rev: 0200
  Type:   Sequential-Access                ANSI SCSI revision: 02
Host: scsi0 Channel: 00 Id: 09 Lun: 00
  Vendor: SEAGATE  Model: ST336607LW       Rev: 0007
  Type:   Direct-Access                    ANSI SCSI revision: 03
Host: scsi0 Channel: 00 Id: 11 Lun: 00
  Vendor: SEAGATE  Model: ST373307LW       Rev: 0007
  Type:   Direct-Access                    ANSI SCSI revision: 03

I’m going to combine all the ST336607LW disks into a software raid. First, create a new partition on each of these disks. Then create the raid.

# mdadm --create --verbose /dev/md0 --level=5 --raid-devices=4 /dev/sdb1 /dev/sdc1 /dev/sdd1 /dev/sde1
# mkfs.ext3 -m0 -j -O dir_index,resize_inode,sparse_super /dev/md0
# tune2fs -c0 -i0 /dev/md0

After mounting, I have a 109GB drive mounted as the raid. Not much, but it’s a little more disk space to use. I’ll also mount the other disks, which are a little bigger to give me a bit more space.

I’m trying to get a new Dell Latitude D630 to dual boot. Installation of XP and RHEL5 went fine until I had to configure X. This laptop came with either an intel video card or an nvidia one. Sadly, we got the intel one and I can’t get the drivers for this card to work with RHEL5. I found a couple of webpages where this configuration supposedly did work using Fedora Core 7. So, I downloaded FC7 and tried to install. Here it was unable to find a driver for the dvd player. I think it would work if I had cds, but FC7 only comes with a dvd image. I’m now copying the entire dvd to our nfs fileserver and will try to use a network install.

That worked fine. The installation proceeds as it should.

I just set up a laptop running linux and had to get the wireless network card working. I basically followed the installation instructions here. Note the required kernel. I had tried doing this on a rhel4 machine, but it didn’t work until I upgraded to rhel5. Then, there were no problems. I added a script for eth1 in /etc/sysconfig/network-scripts, added a line starting the ipw3945d daemon in /etc/rc.d/rc.local and added alias eth1 ipw3945 to /etc/modprobe.conf. After that, the user simply has to issue the following commands to use the network card. ( I added users to the sudoers list so they don’t have to be root.)

sudo /sbin/iwconfig eth1 essid network_name key off
replace network_name with whatever network to connect to

sudo /sbin/dhclient eth1

That’s it. To see the available wireless networks, use:

sudo /sbin/iwlist eth1 scanning

We have a Dell 2407 widescreen monitor and an NVIDIA Quadro NVS 285 video card. I was not able to get the screen working at 1920×1200 resolution until I added a Modeline line to the monitor section of my xorg.conf file.

Here is the relevant part of xorg.conf to get this setup working properly.

Section "Monitor"
        Identifier   "Monitor0"
        VendorName   "Monitor Vendor"
        ModelName    "Dell 2407WFP (Digital)"
        DisplaySize  520        330
        HorizSync    30.0 - 83.0
        VertRefresh  56.0 - 76.0
        Option      "dpms"
        Modeline    "1920x1200" 154.128 1920 1968 2000 2080 1200 1203 1209 1235 +hsync -vsync

EndSection

Section "Device"
        Identifier  "Videocard0"
        Driver      "nv"
        VendorName  "Videocard vendor"
        BoardName   "NVIDIA Quadro NVS 285"
EndSection

Section "Screen"
        Identifier "Screen0"
        Device     "Videocard0"
        Monitor    "Monitor0"
        DefaultDepth     24
        SubSection "Display"
                Viewport   0 0
                Depth     16
                Modes    "800x600" "640x480"
        EndSubSection
        SubSection "Display"
                Viewport   0 0
                Depth     24
                Modes    "1920x1200" "1280x960" 
        EndSubSection
EndSection

1. Make the partition with fdisk, be sure to set the partition type as Linux swap
2. Run mkswap /dev/
3. Edit /etc/fstab to automatically mount the swap partition

Can also use swapon to add it immediately.