We now have a machine with just under 2TB worth of storage to use for backing up laptops. The 1.75TB are made by setting up a raid 5 system with the eight 250gb drives connected to the machine. The raid is then mounted as /local/ls1 (Laptop Storage #1).
On this disk, a directory will be created for each person wanting to use the system. Then, that directory is available through samba, after the user has logged into the system.
So, as an example, if our samba server is set with the following and user george wants to mount it:
Hostname of samba server: backup.uchicago.edu
Workgroup: UCHEP
Samba Share: user
user: george
Want to mount it to directory zzz, located in the current directory
Use the following commands:
Windows
Double-click on “My Computer”. Go to Tools -> Map Network Drive.
Drive: Choose a letter for the drive to use
Folder: \\backup\user
A window will appear for you to enter your username and password.
MAC OS X:
sudo mount_smbfs "//UCHEP;george@backup/user" zzz
You’ll be prompted for a password twice here. The first is your account password on the mac, which is from the sudo command. The next prompt is for your samba password. Unfortuately, both prompts look the same.
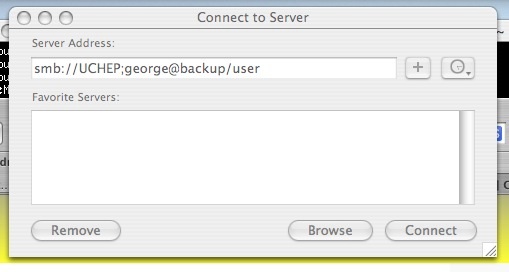
The other way to mount the disk is through the Finder. In the Finder, go to Go -> Connect to Server. In the window that appears, enter: smb://UCHEP;george@backup/user.
Then enter your samba password in the next window that appears.
Linux:
Must be root to run this command
mount -t cifs //backup/user zzz -o user=george,domain=UCHEP