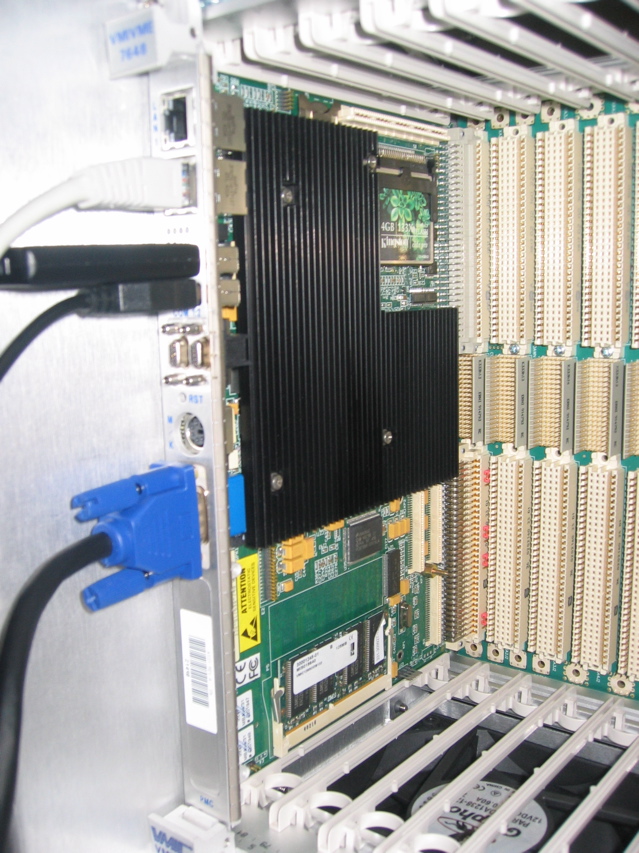
Wah bought some VMIVME-7648 controllers that looked very much like the VMIVME-7700 that we already had. Here is a lousy picture of one of the controllers.
My job was to install linux on them and get them ready for use in our teststands. First problem was that they did not have any method of booting from usb. Since that was the only way to connect a dvd drive with the software on it, this turned out to be a problem. They did, however, have PXE booting. I set up a little dhcp server on another linux box (using a second network card), but could not get it to boot that way either. In the logs, I could see that it requested an address and that one was offered, but after that it would just timeout.
I finally figured out that the best thing to do was to install linux on the compact flash card on a different computer and then put the compact flash card in the controller. Though when I did a standard installation, the error message that I kept getting was:
UMB upper limit segment address: E884
Fixed Disk 0: CF Card
ERROR:
0200: Failure Fixed Disk
I knew that the disk had really not failed because I had tried three different ones and they worked in other systems, just not that one. At first, I was using a 4GB compact flash card and thought that it was failing because it was too big. The one piece of documentation I found on this board said that it originally came with either a 256MB, 512MB or 1GB compact flash card. So I switched to trying to use a 1GB card. The problem here is that it was quite difficult to get RHEL onto a 1GB card, but it could be done by using a minimal install. (Interesting side note: when I did a text install, I never saw minimum as a choice in the package listings, but I did see it when I did a graphical install. Weird.) I had also downloaded and tried to install Damn Small Linux, but I couldn’t get that installed either.
My first bit of success came when I changed the format of the disk from ext3 to ext2. Now, when I boot, I at least got some error messages. I got the following:
hdc: dma_timer_expiry: dma status == 0x21
hdc: DMA timeout error
hdc: dma timeout error: status=0x58 { DriveReady SeekComplete DataRequest }

ide: failed opcode was: unknown
VFS: Can't find ext2 filesystem on dev hdc.
mount: error 22 mounting ext2
mount: error 2 mounting none
Switching to new root
switchroot: mount failed: 22
umount /initrd/dev failed: 2
Kernel panic - not syncing:  Attempted to kill init!
The problem with everything was in the BIOS of the computer controllers. The clue here is that there’s something to do with DMA. I tried adding
ide=nodma
to the kernel line in the grub.conf file, but that didn’t help too much.
The solution was in the BIOS of the controller. I changed the parameters of the compact flash card from “Auto” to “User”. Then, I could disable the “Ultra DMA Mode”, which solved all problems.
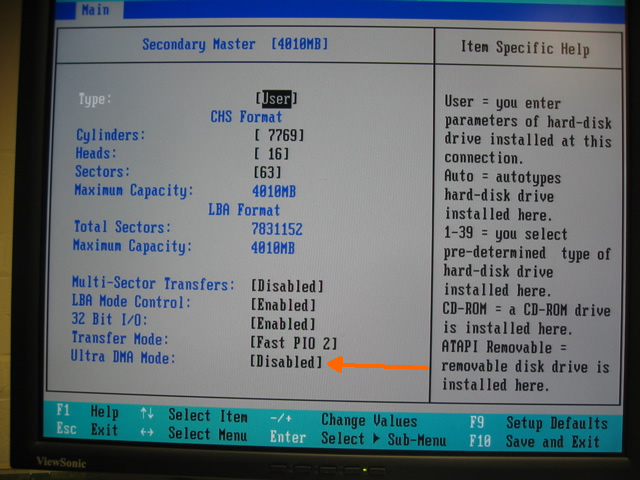
Notice in the image that the compact flash card comes up as the master on the secondary controller. I don’t know why this is, but it followed this behavior on all three controllers that I tried. This meant that I knew what the device name of the hard disk would be in linux (/dev/hdc).
So, how did I install linux on the compact flash card? Fortunately, I had a usb-connected multiple card reader.
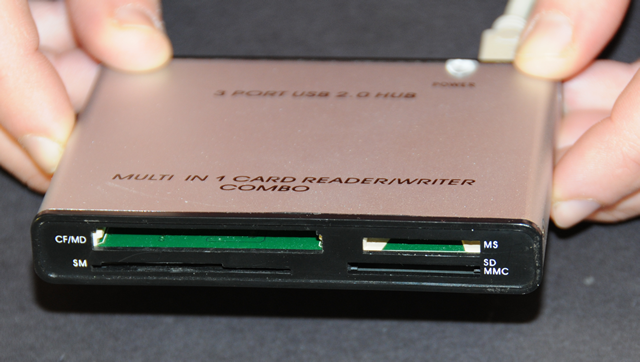
I went to a desktop computer and disconnected all the internal drives (except the cdrom) and hooked up the usb card reader with the compact flash card inserted. I then boot off the rhel4 installation cd and entered the following at the boot prompt.
boot: linux expert askmethod
The expert flag is needed so that I could see the attached usb drive. The askmethod was so that it would let me do a network install. (I needed this because I didn’t have a dvd drive on the computer I used. A network install was easier for me.)
When you get to the page about partitioning the drive and whether to use “Disk Druid” or manually, you have to choose manual. Once you do, it will immediately popup an error message about /dev/sda not being present. After you dismiss that one (click Ignore, I think), another will pop up noting /dev/sdc is missing and then it will happen again with /dev/sdd. The reason for this is because my card reader will actually read four different types of flash cards. It just happens that the compact flash card comes up as the second in the chain, so it’s always /dev/sdb. Since I used a 4gb card, I created a 200mb /boot partition, a 512 mb swap partition and the rest under /. The next page asks about the bootloader. The default is for it to install grub on /dev/sda, which is a problem because there is no /dev/sda. I think I tried putting it on /dev/sdb1, but that didn’t work either. Somewhere on that page, there’s a checkbox for advanced bootloader options. Check that and on the next screen, you’ll be allowed to change the order of the drives. Here, you can switch /dev/sdb to be the first drive, so that grub will be installed on the master boot record on /dev/sdb, which is what we want. After that, there was nothing else very special about the installation. I just unselected most packages because we didn’t need them. (When I was using the 1gb compact flash cards, I just selected “Minimal” install.) Installing to the 4gb compact flash card took a couple of hours.
With linux (in our case RHEL4) installed on the compact flash card, I reconnected all the drives on the pc and boot it. I then mounted the compact flash card and edited /etc/grub.conf. Here’s what my final /etc/grub.conf looked like:
boot=/dev/hdc
default=0
timeout=3
title Red Hat Enterprise Linux AS (2.6.9-78.EL)
	root (hd0,0)
	kernel /vmlinuz-2.6.9-78.EL ro root=/dev/hdc3 ide=nodma
	initrd /initrd-2.6.9-78.EL.img
I plugged that in the crate controller and started it up. When kudzu starts, you’ll be prompted to remove some hardware that was on the computer used for installation and then install hardware specific to the vme computer. After that, you’re all set. The only error message I get is one complaining that RHEL4 requires 256mb of ram and these computers only have 128mb. However, it still runs fine. I’m going to order some ram for these to get rid of that error, but it’s not a big worry.
The last step, for us, was to install the VME software. Since I had downloaded it previously, all I needed to do was copy it to the new computer and compile it. This is where having the 4gb card is great. I had enough space to install all the development tools, so I just had to run make install to get it all set up. Final step is to automatically load the vme module. Add the following to /etc/rc.d/rc.local:
modprobe vme_universe
I also attached a little 2gb usb flash drive for storage. (When I get a bigger one I’ll use that.) I then copied all the programs from our old controller to the new one and checked that they worked. We haven’t run any big tests yet, but so far everything appears to be working.